Creating a Spring Boot Starter
You may remember the story about the fictitious team developing a laboratory information management system (LIMS) from the article about “Evolving test setup and test data management”. This time we will observe this team developing an own simple, spring boot starter module. In a different post, we will observe the team implementing a reference service for the storage module. You can find the code for this article on GitHub.
Why separate the business logic from the framework
The team was rather happy having a small storage module ready and tested. They had the requirement to keep the implementation of the persistence layer abstract. Now they think about creating a small reference implementation consisting of a small backend service with an HTTP API (maybe fully RESTful, maybe not) and a postgres database as storage. A bit into the discussion, they have come up with a lot of different ways to do this. They could use ktor, Quarkus or Spring Boot. They could add extra modules for web boundary and for persistence boundary implementations. They could put all into one module. They could try to keep their business logic module as clean of framework code as possible.
With all these options, they assess the knowledge available in the team. Nobody has yet worked with ktor or quarkus. Everybody would like to experiment with at least one of it. However, they have a time (and money) constraint. The team discuss this and come up with a kind of compromise: The goal is to keep the business logic as clean as possible from framework code. Even project management liked the idea of keeping this separated and not coupling the business logic very tightly to a specific framework. The team promises to not drive this to an extreme and reimplement available framework just to keep the business logic separated. If they want to use any framework features, they will try to put this into a specific module.
With this promise and goal in mind, the team starts to get to work.
Creating a Gradle composite build
The team still wants to keep working in one repository and keep on using Gradle as a sole build tool. The first thing they have to do is to move some files and prepare everything for a composite build.
But what is a composite build? Let’s have a look at the docs.
A composite build is similar to a Gradle multi-project build, except that instead of including subprojects, entire builds are included.
Composite builds allow you to:
- Combine builds that are usually developed independently, for instance, when trying out a bug fix in a library that your application uses.
- Decompose a large multi-project build into smaller, more isolated chunks that can be worked on independently or together as needed.
A build that is included in a composite build is referred to as an included build. Included builds do not share any configuration with the composite build or the other included builds. Each included build is configured and executed in isolation.
This setup will allow developing the storage module as a library and the backend service as a different project. There is one limitation the team needs to keep in mind: Composite builds do not share any configuration! This could lead to have to manage dependency versions at multiple places. There are solutions to this problem like version catalogs, platform projects and maven BOMs. However, the team decides not to add this complexity just now. But they bookmark the platform docs.
The first step in moving to a composite build is moving the old project root on level down into an own subdirectory. The next step is to create a new Gradle configuration in the new project root.
We now have a directory structure like:
project
|   gradle.build
|   settings.gradle
|---lims-storage
    |   gradle.build
    |   setting.gradle
    |---src
The contents of the former project root are moved completely into lims-storage. The gradle.build in the new project root
is empty. The settings.gralde looks like this:
rootProject.name = "blog-lims"

includeBuild("lims-storage")
There is a project name defined and the lims-storage project is included as a build with includeBuild. This is all that is needed
to create a simple composite build setup. All other builds can be added with yet another includeBuild directive.
If you like to see this in code, use this link to jump directly to the commit.
Adding a spring boot project
The team now opens up SpringInitializr and configures a spring boot project with the needed dependencies. They then use
the downloaded archive, extract it and put the code into a new folder named spring-boot-backend and add it as included build to the
root projects settings.gradle. They also update some versions to be able to use Kotlin 2.x and add some dependencies not available in
SpringInitializr, like KoTest.
The directory structure now looks like
project
|   gradle.build
|   settings.gradle
|---lims-storage
    |   gradle.build
    |   setting.gradle
    |---src
|---spring-boot-backend
    |   gradle.build
    |   setting.gradle
    |---src
and the root settings.gradle like this:
rootProject.name = "blog-lims"

includeBuild("lims-storage")
includeBuild("spring-boot-backend")
Here is the commit for adding the spring boot project. And here the commit adding some more dependencies.
Integrating the storage module into the backend
The team now sets out to create the backend using the lims-storage as module in the spring boot backend. In a subproject build
this could be done simply by adding a dependency to project(:subproject) like described in the docs.
However, in a composite build this is a bit different and this is done by dependency substitution.
The team modifies the root project settings.gradle to look like this:
rootProject.name = "blog-lims"

includeBuild("lims-storage") {
    dependencySubstitution {
        substitute(module("de.maschmi.blog:lims-storage")).using(project(":"))
    }
}
includeBuild("spring-boot-backend")
and in the build.gradle.kts of the spring-boot-backend the add:
implementation("de.maschmi.blog:lims-storage")
as dependency.
The change in the settings.gradle tells Gradle to substitute a dependency to de.maschmi.blog:lims-storage using the root project (project(":"))
of the lims-storage included build. (Commit for these changes)
While this works and already allows encapsulating library code using the internal keyword and hide if from the backend, the team is not yet happy. Something feels off. They somehow need to tell Spring how to create beans out of the library code. At least for the use cases
in lims-project/src/kotlin/application and maybe also for the default in memory repository. While they could do this with @Configuration and @Bean directly in the
backend, they fear this could blur the border between these two modules and also would mean the developers on the backend service would need to know details of the storage
library. One person in the team suggests creating a Spring Boot starter by using autoconfiguration. Everybody on the team has at least heard of these words, some have
some insights, others always wanted to do this.
Creating a Spring Boot-Starter
The team discovers a good description on how to create your own starter in the official Spring Boot-Docs.
But what exactly is a Spring Boot starter?
A typical Spring Boot starter contains code to auto-configure and customize the infrastructure of a given technology, let’s call that “acme”. To make it easily extensible, a number of configuration keys in a dedicated namespace can be exposed to the environment. Finally, a single “starter” dependency is provided to help users get started as easily as possible.
Usually a Spring Boot starter consists of two modules. The autoconfiguration module and the starter module. The docs state they can be merged if wanted. The team
decides to keep them separate and to create a new build lims-storage-boot with two subprojects
lims-storage-spring-boot and lims-storage-spring-boot-starter.
Auto-Configuration
The build.gradle.kts of the lims-storage-spring-boot module looks like this:
plugins {
    kotlin("kapt")
}

dependencies {
    implementation("org.springframework.boot:spring-boot-autoconfigure")
    kapt("org.springframework.boot:spring-boot-autoconfigure-processor")

    api("de.maschmi.blog:lims-storage")
}

tasks.withType<JavaCompile> {
    options.generatedSourceOutputDirectory = file("$projectDir/generated")
}
This autoconfiguration module depends on the lims-storage module and re-exports it via the api directive. This means, every project
depending on this autoconfiguration project will also see the public elements of lims-storage. KAPT is needed as the team
is using Kotlin with a Java annotation processor.
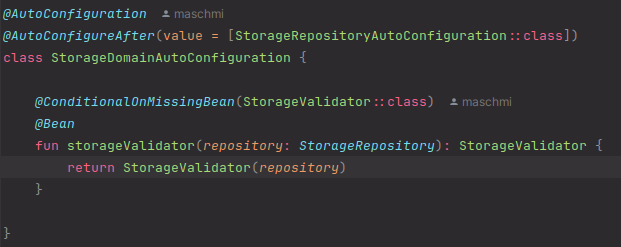
The team creates three different autoconfiguration classes. Each Bean is annotated with @ConditionalOnMissingBean($BeanClass::class) where $BeanClass is the class
from which this Bean should be created from. @ConditionalOnMissingBean allows the consumer of this autoconfiguration to supply their own Bean instead. There is one more
thing the team adds to the autoconfiguration classes; they give them order, e.g. @AutoConfigureAfter(value = [StorageRepositoryAutoConfiguration::class]) the beans in the
StorageDomainAutoconfiguration must be created after the StorageRepositoryAutoConfiguration was evaluated. This makes sure the dependencies needed are created in advance.`
The Starter
The starter’s build.gradle.kts depends on the autoconfiguration module and on Spring Boot’s starter dependency.
dependencies {
    implementation("org.springframework.boot:spring-boot-starter")
    api(project(":lims-storage-spring-boot"))
}
and a single file in src/resources/META-INF/spring/org.springframework.boot.autoconfigure.AutoConfiguration.imports with
references the autoconfiguration files from the autoconfiguration module.
de.maschmi.blog.lims.storage.boot.configuration.StorageCabinetUseCaseAutoConfiguration
de.maschmi.blog.lims.storage.boot.configuration.StorageDomainAutoConfiguration
de.maschmi.blog.lims.storage.boot.configuration.StorageRepositoryAutoConfiguration
Usage of the api directive on the dependency to the autoconfiguration module exports the lims-storage dependency of it
to the consumer of the starter. As the starter and autoconfiguration modules are subprojects of the same build, the dependency
can be described without the use of dependency substitution.
However, making the starter usable by the backend project, the team needs to add a dependency substitution to the root project’s
build.gradle.kts
includeBuild("lims-storage-boot") {
    dependencySubstitution {
        substitute(module("de.maschmi.blog:lims-storage-spring-boot-starter")).using(project(":lims-storage-spring-boot-starter"))
    }
}
and use it in the backend project’s build.gralde.kts like this:
implementation("de.maschmi.blog:lims-storage-spring-boot-starter")
You can look at the code and the changes in this commit.
Using the Starter
Last but not least, the team codes a quick check to see if the starter and setup are working as expected. They add an ApplicationRunner
to the backend:
@Component
class AppStartupRunner(
    private val commissionStorageCabinet: CommissionStorageCabinet,
    private val getListOfStorageCabinets: GetListOfStorageCabinets
) : ApplicationRunner {
    override fun run(args: ApplicationArguments) {
        println("Hello from AppRunner")
        commissionStorageCabinet.execute(
			name = StorageCabinetName("test"),
			room = Room(RoomName("test-room"))
		)
        val cabinets = getListOfStorageCabinets.execute()
        println("List of Storage Cabinets: $cabinets")
        exitProcess(0)
    }
}
This should use the autoconfigured use-cases and in-memory repository. After startup, the team finds this
Hello from AppRunner
List of Storage Cabinets: [domain.StorageCabinet@a2c981b0]
in the logs. It is working! The team is happy. But they also notice the need to be more disciplined adding toString() overloads
to domain objects. In the next step, they will add a web and persistence boundary and maybe use MapStruct for mapping where needed.